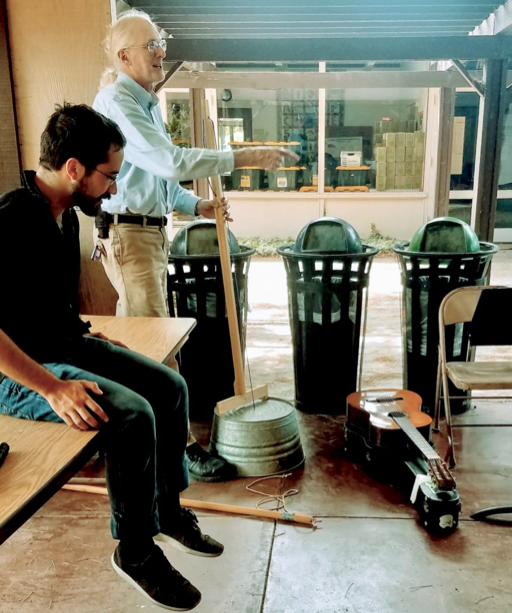
Steve lent me his washtub bass, so I could take it home and try to learn to play it.
Steve’s washtub bass is simplicity itself: a 15 gallon galvanized washtub with a hole drilled in the center of the bottom; a length of 3/16 inch braided polypropylene rope, and a broom handle with an eyebolt screwed in one end and a slot cut in the other end. Tie a stopper knot in one end of the rope, thread it up through the hole, and tie it to the eyebolt. Place the slot of the broom handle on the rim up the upturned washtub, pull the string taut, and there you are.
Playing the washtub bass is not so simple. You have to put one foot on the rim of the washtub to keep it on the ground. You adjust the pitch by changing the tension of the rope by tilting the broom handle back and forth. The range is pretty limited — I got less than an octave — and it’s a challenge to get exactly the pitch you want. The biggest disadvantage, though, is that playing it took a lot out of me: it’s a real workout to move that broom handle back and forth, and twanging the braided rope is hard on your hands. After half an hour, it became clear that it was going to take more time than I was willing to devote to building up strength and building up callouses.
There had to be a better way. I began researching other ways of building and playing the washtub bass.
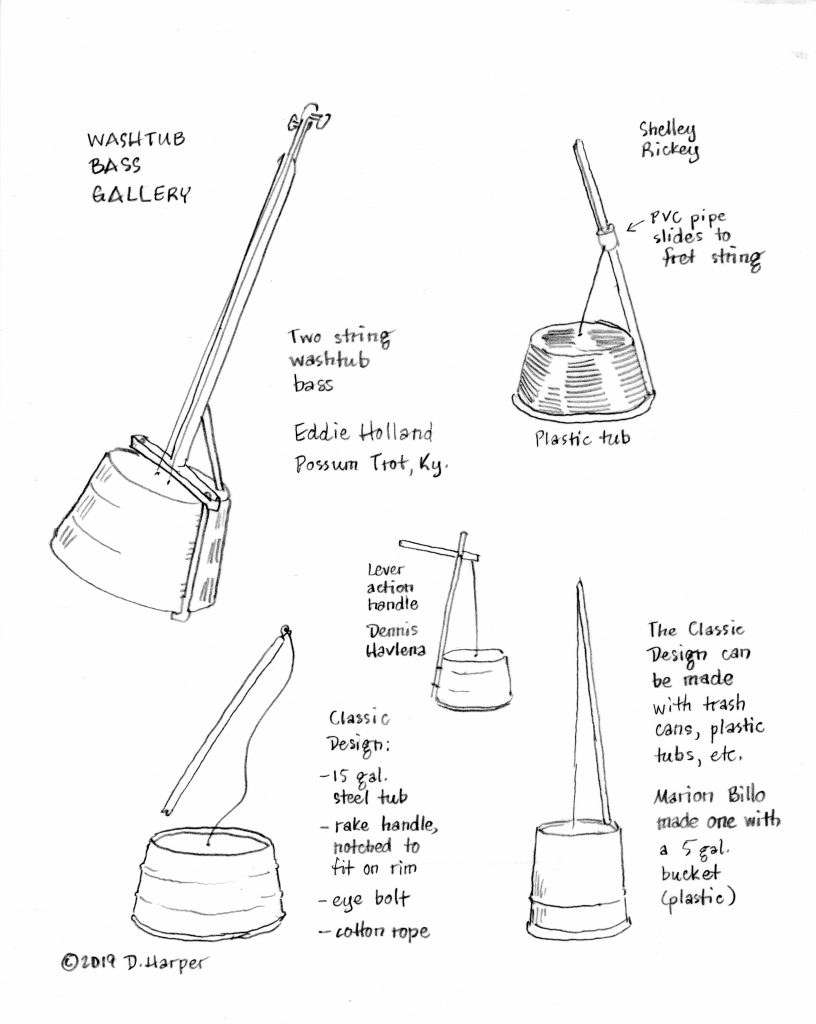
Eddie Holland of Possum Trot, Kentucky, built himself a two-string washtub bass with a fixed neck that you play by fretting, not by moving the neck. He’s a heck of a player, and his bass sounds great, but by the time you buy the hardware, the tuning machines, and a couple of strings for an upright bass, his bass probably cost a couple hundred dollars.
Shelley Rickey has a washtub bass made out of a big plastic tub with an arm bolted on the side; the string is fretted by means of a short length of PVC pipe that you slide up and down. She has a video where she plays cigar-box uke and her partner plays the bass, and the bass sounds good. But it still takes a lot of muscle: “I’ve been playing it now for five years,” Shelley writes, “and have developed the arms of a lumberjack.”
Dennis Havlena of Michigan devised a lever-action arm to reduce the muscle strain. Marion Billo shows plans for Joe Birdsley’s five-gallon (plastic) bucket bass with a special attachment for keeping it on the floor. But I don’t see that these offer much advantage over Shelley Rickey’s design.
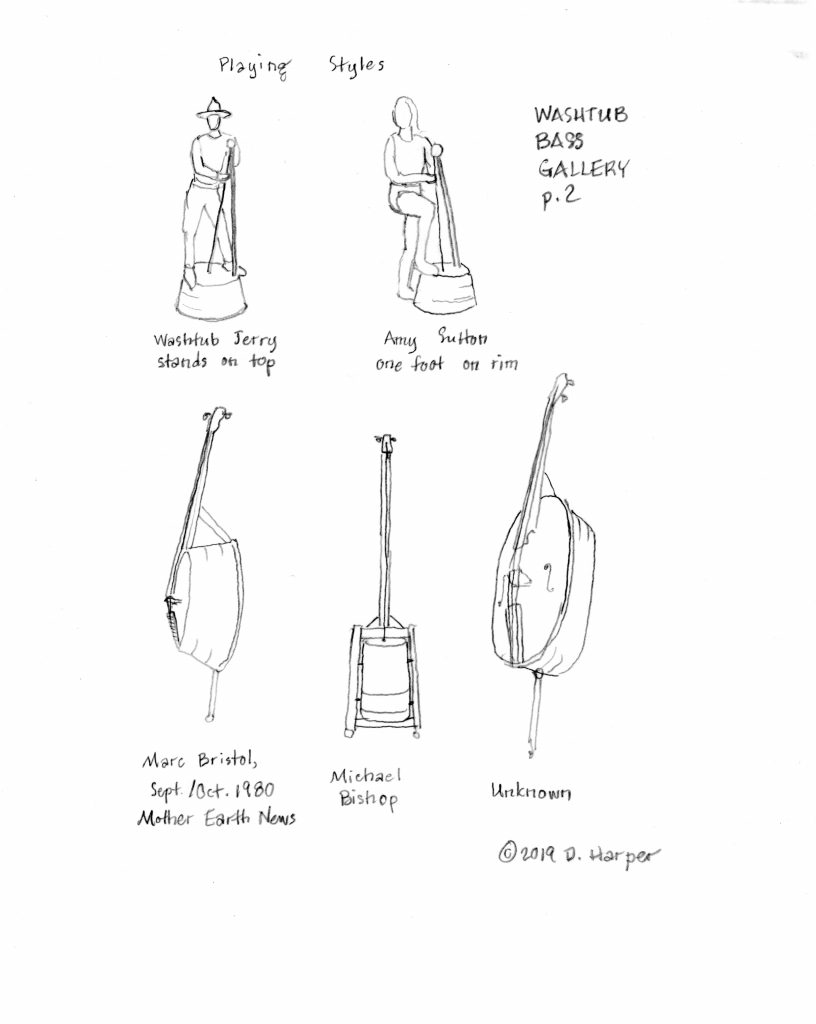
I found different playing styles, too. “Washtub Jerry” stands with both feet on the rim of the washtub; this brings the neck of the bass closer to his body, which might give him better control. I also found a photo of Amy Sutton holding down the rim of the washtub with a bare foot, which seems like it would be painful.
There are also more complicated designs for washtub basses where you don’t tilt the neck to play. Michael Bishop made a hardwood frame with a five-gallon bucket as the resonator, and a fixed neck and tuneable string. Marc Bristol, writing in Mother Earth News, September/October, 1980, issue, describes an elaborate upright bass made using a washtub as the resonator. I found a photo online of bass made on a similar plan, except the oblong washtub supports a wood sound board.
I guess if you really want an upright bass and you can’t afford a wood one, you could make one of these. But these really aren’t washtub basses; these are upright basses made in folk instrument style. The upright bass is an instrument in the violin family from Europe, but the washtub bass has roots in another continent. According to “Afro-American One-Stringed Instruments, an article by David Evans in Western Folklore (vol. 29, no. 4 [Oct., 1970], pp. 229-245), the washtub bass comes from Africa:
“Two kinds of one-stringed instruments are known to Negroes in America today. One is the familiar one-stringed bass, sometimes called a ‘washtub bass’ or ‘gutbucket’ from the materials of its construction…. Its origin in the African ‘earth bow’ has been pointed out and generally accepted. This African instrument is made by digging a hole in the ground and covering it with a membrane of bark or hide, which is pegged down at the edges. From the membrane a string is led to a nearby sapling or stick placed in the ground. The string is then plucked, the covered hole serving as a resonator. In America an inverted washtub is simply substituted for the membrane and the hole.”
(The other one-stringed instrument is a “jitterbug,” which is a single string played in bottleneck guitar style; the jitterbug derives ultimately from the mouthbow).
What I was looking for was a version of the washtub bass that didn’t require me to develop the arms of a lumberjack, yet retained the flexibility and character of the American version of the African earth bow. And what I found was the simple yet elegant washtub bass built and played by Jim Bunch. He describes his instrument as follows:
“I have built a cross brace for the pole using a board the width of the tub supported by two small blocks that fit on the rim. This allows you to support the pole closer to the center of the tub and get good notes without putting as much tension on the string and your fingers. [Moving the pole changes the string tension and the pitch, but] you can also move up and down the pole to change notes. I tend to both adjust the tension and finger 5ths when I play. I screwed a rubber table leg cover to the middle of the cross brace that the pole fits in. This allows the pole and brace to be disassembled for the trunk of the car.” (from the Tub-o-Tonia Web site, c. 2005?)
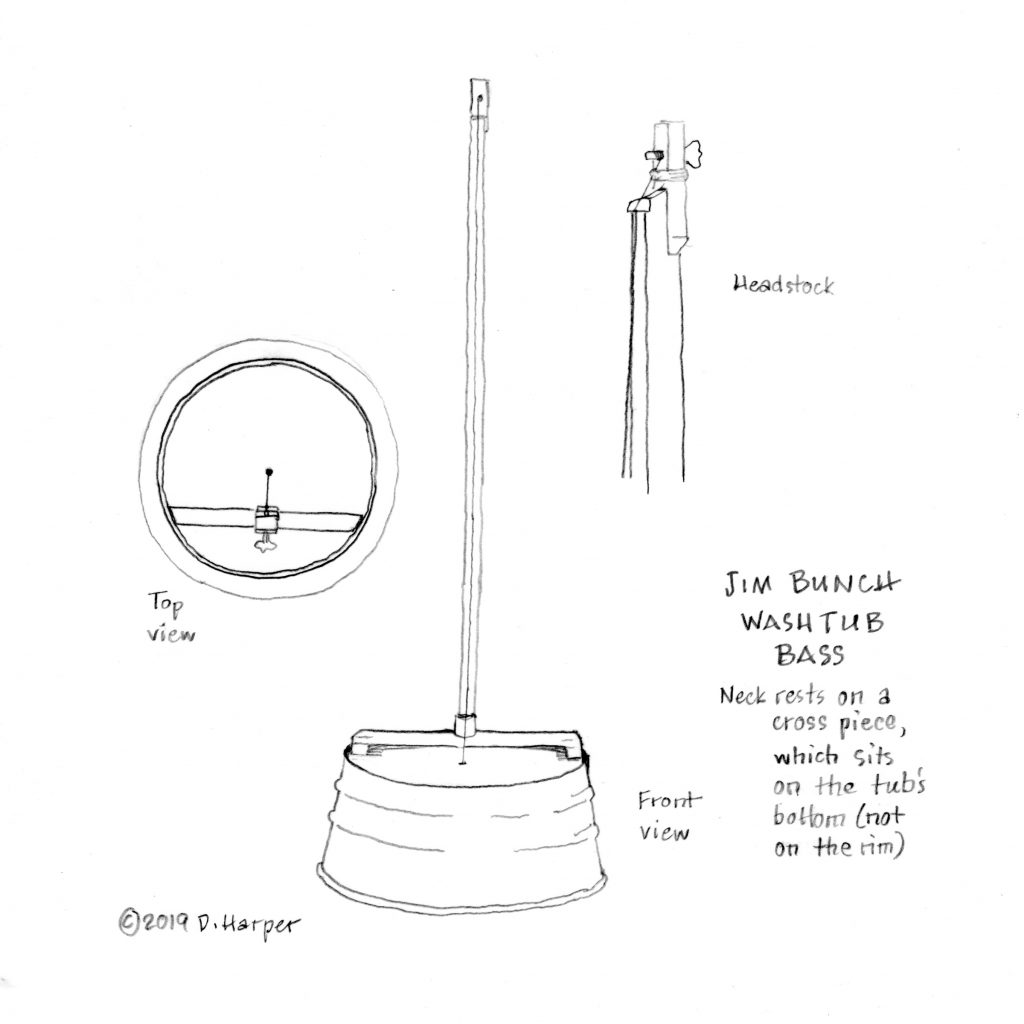
This keeps the simplicity of the instrument; all you’re adding is a cross brace. You can still change pitch by changing the tension of the string, but it requires a lot less arm strength. And you can fret the string up and down the neck (without having to slide a PVC pipe). Using some scrap wood I had lying around, I made my own version of this, and it’s really a joy to play.
Since Jim Bunch first described his instrument on the Tub-o-tonia Web site, he has made a few modifications (see this discussion for some details). He replaced the metal bottom of the tub with 1/4 inch thick Lauan plywood; for strings, he upgraded from a 3 dollar bike derailleur cable to an upright bass woven-core G string (perhaps 50 dollars). Photos of his instrument reveal that he’s added a headstock with a nut to hold the string a bit off the finger board, as well as a tuning machine. These somewhat elaborate modifications make sense for him because he plays a lot, and he plays at a pretty high level, as you can see from his Youtube videos.
I’m not trying to perform at Jim Bunch’s level, but I feel his type of washtub bass — with the neck supported on a cross brace — is the best bet for an occasional player like me. After a couple of hours of practice, I’ve gotten good enough that I’ll be able to play in tune on simple songs at a low-key folk music jam session. And that’s all I want.
Update #1 (Aug. 9, 2019)
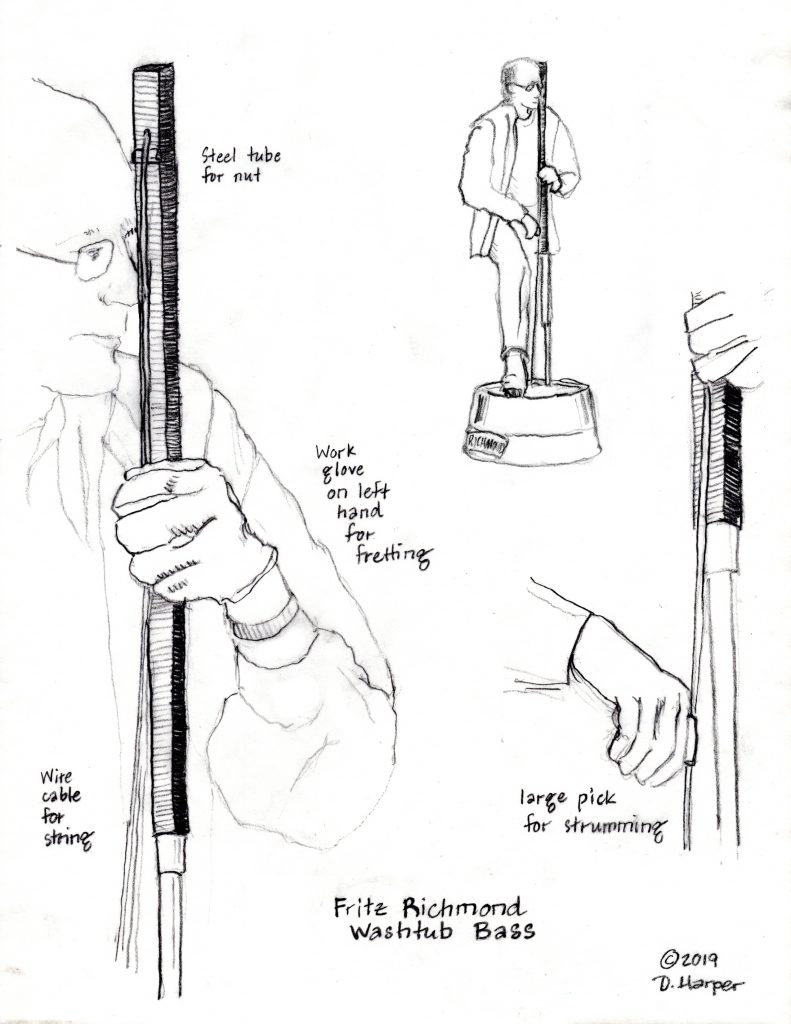
I’m adding sketches of Fritz Richmond’s washtub bass. Richmond played washtub bass in the Jim Kweskin Jug Band, and played washtub bass with popular musicians from Maria Muldaur to Loudon Wainwright to the Grateful Dead. One of his washtub basses is reportedly in the Smithsonian. In short, Richmond is probably the most famous of all washtub bass players, so his bass and his style of playing are worth looking at. A few things I noticed: First, the neck of his bass has a metal lower part and wooden upper part; it looks like it can be broken down for easier transport. Second, videos of Richmond’s playing style show that he both moved the angle of the neck and fretted up and down the neck. Third, he uses a metal nut, which in photos looks like it’s a section of a metal guitar slide. It’s also worth noting that Richmond used a special leather-and-steel glove for fretting, and a large pick for strumming.
Addendum (July 12, 2019)
Details of my additions to Steve’s washtub bass: I took his washtub, replaced the line (it was rough and worn and hard on my fingers), and added a neck with a Jim Bunch style cross brace. I made the neck out of scrap wood (including a discarded floral tripod that I found in the cemetery’s trash). The string is a new piece of 3/16 inch braided polypropylene rope, which I’ve tuned roughly to D, a good tuning for many simple folk melodies. The string is tied off with figure-eight knots (a stopper knot that’s relatively easy to adjust for tuning). And Steve’s original mop handle and string are untouched, so I can return his instrument to him just the way he gave it to me. The photo below gives an idea of the most important dimension for the Jim Bunch style washtub bass — the distance between the neck and where the string is attached to the washtub.

Update #2 (Nov., 2023)
A couple of months after I wrote this post, I built a brand-new washtub bass from the ground up. I used Jim Bunch’s basic plan, as shown above. I decided to spend some money, with a total cost of about $150. (And yes, I returned Steve’s washtub bass to him.)
Materials list, with approx. 2019 prices:
- string: steel G string for an upright bass (~$30)
- tuner: tuning machine for a bass guitar (~$60 for set of 4)
- nut: piece of birch I had lying around, attached to neck with brass screws
- washtub: Behrens 15 gallon hot-galvanized tub (~$40)
- neck: 2×2 redwood (~$10)
- cross brace: birch boards I had lying around (free)
- metal angle braces to hold the neck on the cross brace
Construction notes:
While Jim Bunch said he used a bike derailleur cable successfully, the one I tried was not satisfactory. So I bit the bullet and bought an actual bass string.
My first build did not include a tuner. However, after playing once or twice I realized that a tuner would allow me to set the string tension so I could use my preferred neck angle. It’s not necessary, but I felt it was well worth the money.
I cut several nuts before I got one that held the string just the right distance away from the neck — not so far that it was hard to finger the notes, but far enough to get a good clean sound. The brass screws allowed me to experiment with different nuts (as opposed to gluing in a nut).
I chose the Behrens hot-galvanized washtub because it was sturdier. Some of the cheap washtubs looked like they’d crumple after a couple of hours of playing with your foot pressing down on them. It is essential that you remove the handles on the side, because they’ll vibrate audibly when you play (I learned this the hard way).
I made the neck out of redwood because that was the cheapest 2×2 clear, straight lumber I could find at the lumber yard that day. It was actually graded as construction grade, but I found a six foot length that was clear of knots. My only concern with using redwood for the neck is that it can produce massive splinters; I carefully rounded the corners to reduce that possibility.
I used birch for the cross brace because that’s what I had lying around. Any strong wood clear of knots would do equally well.
The hardest part of the build was getting the cross brace to sit the correct distance back from the hole where the string attached. I had to adjust the cross brace several times to get that distance exactly right.
You could build this bass for well under a hundred dollars. First, find a friendly luthier or guitar repair shop that would sell you just one tuning machine. Second, find a used washtub. Third, scrounge the wood rather than buying it new. However, I would definitely spring for the upright bass string; it sounds so much better than anything else I tried.
Playing the bass, and its eventual demise
Once I finished adjusting the cross brace and the nut, this washtub bass played like a dream. Just like Jim Bunch says, you can adjust the pitch by moving your fretting hand up and down, or by pulling the neck back. I got most of my notes by fretting, but pulling the neck back was also useful — not only could I get four or five notes by pulling, I could bend notes or produce accidentals. When the guitarists at the jam session decided to capo up from the key of C to the key of D, all I had to do was put a little more tension on the neck and fret in the same positions for both keys.
The hardest part of using the bass was transporting it. I could remove the cross brace. But the neck was attached to the washtub by the string, so I had to balance the neck on the tub while transporting. To protect the neck from scratching, I wrapped in old shirts, but I was always worried about damaging the string.
I had fun playing the bass in our twice-monthly jam sessions. I started out just playing the 1 and the 5 of the chord, one or two notes per measure. But gradually I got to where I could add some quarter note bass runs, and even some more interesting rhythms. I used a pencil to lightly sketch in a few fret markers on the side of the neck: one at the first octave, and one at the first fifth — the equivalent of fret twelve and fret seven — this proved to be very helpful. Accurate intonation was the hardest part of learning to play the washtub bass. I practiced for hours at home playing along to recordings in order to develop acceptable intonation.
The volume of this instrument was adequate for a non-amplified jam session; to increase the volume, I usually raised one edge of the washtub an inch or so (a piece of firm rubber worked well). After I switched to a real bass string, the sound was quite good: smooth with good attack when plucked. The people I played with tolerated me, and even complimented me once or twice.
Then COVID hit, and I put the bass away. When we moved across the country in 2022, we had to get rid of a lot of stuff, and sadly the bass was one of the things that had to go (mind you, I kept the 2 mountain dulcimers I built or rebuilt, a guitar, a ukulele, and some smaller instruments). Equally sadly, I never took a photo of the bass.
Someday I’d love to have another washtub bass. Alas, our new apartment is too small. But I still have the neck and the cross brace…maybe some day….

And here’s a photo of the washtub bass in action:
Good stuff.
Just tried my hand at the WTB today and was surprised at how quickly I picked it up at an old time fiddlers jam.
Got to build my own. Am marveling at the many versions. Too bad my iPad cannot give me the true sound of any of them.
Right off, I am going jump in and try a brand new approach. Maybe to my chagrin. Ie. Conduit pipe neck with Pin attachments to rim Instead of resting on “skin” of instrument. We’ll see how far I get. Probably violating WTB Rudiments.
Oh well, I’m excited. I’ll let you know.
Hey Bruce, glad you’re going to make one! It’s a great instrument. However you make your washtub bass, I think the most interesting thing about the instrument is that you can change the pitch of the string two ways — by “fretting” up and down the neck (which is in fact fretless), and by moving the neck back and forth. That’s what gives the washtub bass its flexibility, and its unique sound.
Conduit would probably make a nice neck, maybe giving a more ringing sound than a wood neck — like a steel resonator guitar compared to a traditional wood guitar. I’ve been playing with my redwood neck now for about a year, and the redwood definitely gives a warmth to the sound, but also I think probably makes it less biting, so it’s harder to hear it above other instruments. So I’ll be interested to hear what kind of sound you get with a metal neck.
I’ve made myself a washtub bass, out of a metal 200 litters barrel of oil. Severed the bottom off at around 35 mm side height to form the tub (Wich i couldn’t find in metal), drilled a hole at the center, then I drilled an old bike piston, passed a cotton rope in and tied to the piston axis. A massaranduba (Brazilian hard wood) arm with a notch at one end and a groove at the other stretches the rope and I climb the border of the barrel tub to give the arm a sensual hug as to a madam and I bounce while playing as if I was dancing a walse. Sounds terrific if you pick the rope more enthusiastically and sustains a deep groove, even with a sensual vibratto. I think I’m gonna show it to Hermeto Paschoal someday, he would love it.
Laudo, that’s not just a washtub bass, that’s a washtub contrabass!